|
Tips
and repair methods to avoid
1.
A key
to successful fiberglass repairing is quality
materials and patience.
2. Make sure your boat hull or deck is not a
painted surface, search around hidden areas
for signs of primer or flaking.
3. Try to remove minor gelcoat scratches by
water sanding using a hard rubber block or hard
piece of plastic with grits 220, 320, 600 or
800 then 1000 before a fill or spray.
4 . Using gelcoat or polyester resin from any
hardware store or boat accessories outlet may
get you frustrated and give you a poor boat
hull repair, gelcoats may be to transparent
even after tinting leaving you the only option
to apply too many coats just to cover and polyester
resin may be to thick or stale for fiberglass
repair.
5 . If using Dixie cups for mixing gelcoat,
epoxy or resins be sure to use cups
with no wax, any cup with wax coating
will leave small shavings from stirring and
disrupt your sprayer and your gelcoat mix. On
very warm days some wax will melt leaving you
with a good amount of food grade wax in your
mixture. Wax additive for gelcoat is a combination
of hydrocarbon solvents.
|
|
Fiberglass Repair and Laminating
1. When fiberglass laminating be sure you have
laminating resin not finish resin as finish
resin has wax additive and must be sanded if
top coated. Finish resin is rarely used in boat
hull repairs or boat building.
2. Stress cracks should always be dish ground
and fiberglass laminated using 2 or 3 strips
of biaxial cloth with matt sewed on the back.
Grind deeper wider and apply multiple strips
if repairing corner rounds followed by specified
filler, the same procedure as repairing a deep
gouge as shown in the instructional using at
least a 3" grinding disc. You may just
grind the gelcoat off then a fill and fare but
most likely the cracks will return quickly.
Simply grinding a gelcoat stress crack using
a dremel grinder then a fill even with epoxy
will crack sooner than later. A professional
should check stress cracks below a waterline.
3. If filling gelcoat chips or voids deeper
than 1/8 inch, finely chop fiberglass cloth
and add it to activated fiberglass laminating
resin for base filler saturating until white
air bubbles are gone and then continue with
your gelcoat repair.
4. Repairing a crack thru fiberglass make sure
to dish grind 5 to 6 inches each side of the
crack, fiberglass laminate and repeat on backside
for maximum strength. Be sure when grinding
on backside to meet the new fiberglass in along
the center removing all fractured glass.
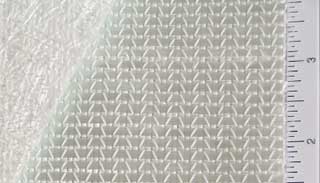
5. For fiberglass boat repair use 18 oz. cloth
or larger up to a very heavy duty 24 oz. woven
roving for the major repairs. Biaxial with 3/4
oz. matt sewed on the back is an ideal cloth
for all types of laminate work and forms well
around corners. If fiberglass laminating a large
area, follow the same procedure as shown laminating
a deep gouge in the instructional, all size
damage is treated equal.
6. If replacing a rotted deck core: Do not use
the old fiberglass skin unless you do not care
about voids, waves and surface cracks forming
within the first few weeks. When removing the
old skin, fractures form in the layers of fiberglass
and the gelcoat will fracture throughout the
surface that is unvisible to the eye when removing,
after the skins edges have been fiberglass laminated
fared in and top coated, the final finish will
only be a bridge over the fractures and all
fractures will re-appear sooner than later,
also you risk the possibility of voids beneath
the skin when attaching to the new wood core.
If using the old skin be sure to grind the entire
surface to apply at least one heavy sheet of
cloth to cover all hidden fiberglass fractures.
7. When repairing snap holes or any small drill
holes, simply filling the hole with polyester
filler, auto bondo or gelcoat filler paste will
definatly crack around the edge sooner than
later. Clean the hole using a drill then use
a chamfering tool to slightly clean up any broken
edge, then chop up fiberglass cloth very fine,
saturate with polyester resin and stuff hole,
when hardened dremel grind just the thickness
of the existing gelcoat then continue with your
gelcoat repairs.
8. Epoxy will adhere to polyester but polyester
will not adhere to epoxy.
9. If repairing fiberglass damage on wave runners
make sure to use epoxy resin with fiberglass
cloth as polyester resins will not adhere to
those types of composites.
10. Using polyester resin for filler mixed with
Cabosil, Aerosil or Cotton for mounting any
structure even filling delamination in a deck
can get very hot if thick and may warp fiberglass
do to extreme heat.
11. Gunk polyester filler is an ideal product
for mounting stringers or anything that requires
a thick filler, it only gets slightly warm even
when inches thick and is activated by MEK Peroxide
(hardener), add 1 or 2% water after activating
to make thick, Gunk is an extremely tough product
and can be found at Michigan Fiberglass Sales
by following the links page on this site, Searay
also uses this product on many models. Epoxy
with slow hardener mixed with specified milled
fibers is another alternative.
|
|
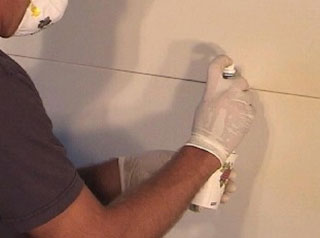
Spraying
Gelcoat
1. When spraying gelcoat with a preval sprayer,
strain your gelcoat after it has been reduced and
activated using a paper disposable strainer then
disregard the plastic strainer attached to the straw
from the preval sprayer, this will give you a heavier
and more consistent spray.
2. For over-all gelcoat refinishing use the same
mix and steps as shown in the instructional instead
of a preval sprayer, apply using an automotive spray
gun, (no special tip needed). Gelcoat has to be
thinned the same for a suction feed or gravity feed
spray gun although Using a gravity feed spray gun
will leave more orange peel than necessary To apply
using a suction feed spray gun will give you a smoother
surface as gelcoat is more atomized throwing a finer
spray yet releasing most solvents when spraying
with around 60lb psi with in line water separator,
keep your spray gun moving to avoid a wrinkle in
the gelcoat over lapping each coat. The heavier
the coat is applied the more micro pin holes will
exist, using a suction feed spray gun will give
you a better quality finish.
3. Never spray gelcoat in direct sunlight during
a hot day, the surface will skin too fast trapping
solvents creating pin holes leaving a dull finish
at job completion.
4. Spraying gelcoat on the entire boat deck or hull
be sure to prime first to cover all pin holes and
repaired areas also to avoid blistering especially
near the waterline, apply 4 coats at waterline and
below, remember you will be sanding off at least
a coat leaving you with 3 coats needed for a water
bearier, 2 coats are fine for the rest of the vessel.
Use Duratech vinylester primer some reccomend polyester
primer though it may be too brittle and eventually
the primer may chalk beneath the sprayed gelcoat
and chip or flake off easily. using auto primers
for a gelcoat refinish is a bad idea, spray at least
5 coats of gelcoat when re-surfacing a complete
boat deck or hull.
5. For gelcoat spot repair be sure to sand far past
the repaired area to be sprayed to make sure your
gelcoat spray does not exceed over the unsanded
surface, use the proper grit for sanding during
the final prep.
6. To avoid a wave or warped finish at job completion,
never use tape around the area, it may only create
a step as overspray build up exceeds onto the tape.
Let your polisher remove any fine overspray that
traveled onto the unsanded gelcoat if any, if using
tape or masking paper stay clear of the area to
be sprayed at least a couple feet.
7. Spraying true colors, red, blue, green etc. and
your color is a bit off give a bigger blend line
and spray 3 coats of clear gelcoat over the base
color and 1 to 2 ft each side of your color blend.
8. Let your gelcoat cure for at least 48 hours before
sanding that will give you a better blend after
polishing as the blend line will be much harder
and thinner without breaking away leaving a gelcoat
repaired area invisible at all angles, using the
proper gelcoat additives of course. |
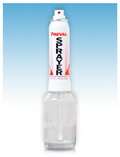 Preval
Sprayer
Preval
Sprayer |
Matching
Gelcoat
1. Matching gelcoat can be easy! Keeping this trick
in mind. Place matching gelcoat in two catagories,
color value and shade value, blending the different
pigments into your gelcoat to reach the same color
as the boat. You want the gelcoat your mixing to
become a little darker than the boat, this will
give you a better visual on where you are with your
color match. If the boat is more on the yellow side
as your gelcoat looks more on the brown side then
add a very small amount of yellow to bring closer
to the boat color, once you obtain the colors to
be some what in sync then use the shade value. Shade
value is the color only lighter or darker , once
you feel your color looks roughly close it's time
to make your gelcoat a couple of shades lighter
by adding white gelcoat, a very small amount at
a time until you obtain the correct shade value.
You may use a very small amount of white pigment
but using too much white pigment may give you a
dingie transparent effect leaving you with a poor
match.
2. Use small strings of tint using a toothpick to
add to your gelcoat one string at a time checking
color before adding more tint, most off whites start
out by using dark yellow or yellow gold followed
by dark brown and light brown at times, then add
a touch of black for the rich oyster colors. When
adding dark tints such as brown, green or black
do not use strings of tint as they are too powerful,
add eye droplet size or less is best when mixing
a pint or 1/2 pint, keep tinted gelcoat in a cool
place.
3. If tinting gelcoat avoid colors in tubes as this
may only make you frustrated and could give you
a very poor repair also leaving you with colored
speckles in your finish. Color tubes have a short
shelf life and are not the same pigment as professional
tints, unless you just don't care about the color.
4. When matching true colors, red, blue, black and
so on use neutral gelcoat for base using clear gelcoat
would be too transparent and should only be used
for top coating. Clear gelcoat is most used with
metal flake repairs.
5. If matching with white gelcoat you may want to
bring a chip sample to your local fiberglass supplier
before purchasing white gelcoat to see if the white
gelcoat is darker than the chip sample, if so search
for a brighter white. It is very important to start
with a high quality bright white, many white gelcoat
products appear to be bright white but may have
a light grey or pink cast to them making it difficult
or impossible to get a good match as many are intended
for mold work or tooling. |
Michigan
Fiberglass can match any color Gelcoat.
Send us a chip sample of the desired color and are
lab will come up with the exact match.
|
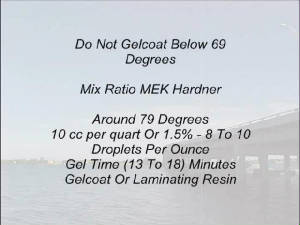
Additives
and thinning gelcoat
1. If thinning gelcoat with Acetone, MEK solvent
or other optional reducers use the least amont possible
start out with 3 or 4% then see if gelcoat sprays
without to much orange peel if so thin a little
more and keep some distance with the sprayer so
solvents get released on the way to the surface.
Gelcoat may lose some shine sooner than normal when
thinning with acetone. MEK solvent is best when
using certain additives and is used for many plastic
applications, MEK solvent has a slightly slower
evaporation rate than acetone but will give you
a better chemical bond to the gelcoat you are covering
therefore becarful not to over activate the gelcoat
and allow a couple minutes between coats for most
solvents to release.
2. If thinning gelcoat with Styrene the following
problems may occur: gelcoat to transparent, easy
to run or sag even too porous leaving a dull finish.
If using styrene wax additive must be added and
should not be used for exterior gelcoat repairs
unless you just don't care about the final result.
3. When using wax additive (surface wax) for gelcoat
make sure it is in clear liquid form, if it appears
to be crystallized or white in color warm it up
with a heat gun and give it a shake and continue.
4. During boat building gelcoat with wax additive
is mostly used for bilges and interior trim panels
or spraying the entire cockpit where gloss is not
an issue, becoming a very dull finish when dry but
looking excellent. Sometimes with addition of adding
some patch booster for the extra heat giving a harder
finish fast, leaving the top layer less tacky.
5. Do not use parting fluid over gelcoat that has
been mixed with styrene, wax additive or patch booster
as the parting fluid would seperate, dry and crinkle
your gelcoat and leave an uncured layer. Also it
would not allow solvents to be released till the
end of the gel process leaving you with very porous
gelcoat.
6. If spraying gelcoat for nonskid using wax additive
the surface will break down wiping with acetone
on any given day and become very sticky until you
have wiped off the uncured layer, once cleaned with
acetone the nonskid sprayed will have a dull finish
at completion.
7. Using straight gelcoat or wax additive with gelcoat
will not hold a shine very long, also on any givin
day long after the repair you would be-able to wipe
the repair using rags with acetone, break off the
blend line of the sprayed area and bring gelcoat
to a dull finish.
8. Using patch booster in gelcoat will not break
down wiping with acetone long after the repair but
may heavily oxidize around 2 years.
|
|
Fillers
1. If using a filler paste for filling and faring
fiberglass do not use auto bondo's, bondo with fiberglass
strands added or tooling aids as they may crack
and gelcoat does not stick well to many of them,
they just don't last on boat repair.
2. Simply by using polyester resin thickened with
finely milled fibers (cabosil) to fill in an area
may crack sooner than later no matter what the thickness
as polyester resin expands with hot and cold weather
and more so with cabosil, resin mixed with fillers
has no tensile strength. Polyester resin should
only be used for fiberglass laminating.
3. When filling corners and small chips use acetate.
Acetate is a clear flexible plastic, specify 30
thousands thick typically used for mold work as
shaping filler: 1 yard may give you a hundred small
spreaders. Use a straight edge razor blade and cut
your pieces using a ruler for the guide, with a
sharp clean edge on your spreader you will have
a flawless filled area of any shape. Acetate used
as a spreader is a very important part of gelcoat
repair when using the correct fillers and gelcoat
paste. The sharper your spreader is the less it
will pull out of the area to be filled as you make
your pass.
4. Gelcoat paste is only good for a quick fill to
somewhat hide the scratch that stands out, by just
using gelcoat paste in a scratch or chip, the repaired
area will be very noticable unless the damage is
small as the diameter of a toothpick. Gelcoat paste
will shrink more than liquid gelcoat because the
filler to make paste and will eventually crack around
the repair due to excess shrinking and may have
pin holes that will show up after polishing, also
getting your repair 100% flat without a wave or
ripple is nearly impossible and in most cases your
paste will not match even with new boats. Using
liquid gelcoat over paste is a much more effective
route for the more professional out come if repairing
small chips, voids or tiny scratches as shown in
the instructional video.
5. Paint tools from hardware stores work excellent
for spreading filler over your fiberlass repairs
(faring large areas) they have a sharp metal edge
and very straight, your spreader should be at least
a few inches longer on each side of the damage to
be filled for fared.  |
|
| Material
cost-Estimate per job type
Fiberglass and
gelcoat repair can be very costly, charging between
$75 and $110 per hour. A gouge or chip may take
several hours to repair.
For fiberglass
repair using the tool and material list inside
the manual you can pickup everything you need
with just a couple stops; your local Marine store
and local fiberglass suppliers should carry all
you need. Fiberglass suppliers on links page carries
all the products you will need and ship fast to
your door at a fraction of the cost compared to
paying a professional.
Repair
all types of damage
Hours of repairs from start to finish by
a professional
keeping in mind a markup on material cost |
Labor
15 to 17 hours
Material cost $110 to $130
|
Labor
9 to 10 hours
Materal cost $70 |
Labor
3 hours
Material cost $25 |
Labor
5 hours
Material cost $35 |
|
| |
|
|
|
| |
|
|